Using Elizabeth Hopkins’s Album Quilt as inspiration, students will create an album quilt of their own that tells their life story in images and patterns. They will read Quilters, a play that was written and produced in Denver, and write a creative piece that connects their experience with literature.
Students will be able to:
- analyze Elizabeth Hopkins’s Album Quilt for its complementary color scheme, use of geometric shapes to create objects and patterns, and storytelling qualities;
- identify and bring in materials from home that represent their lives in a personal and meaningful way;
- design an album quilt of their own that is autobiographical and that tells important pieces of their life stories in visual images; and
- write a creative piece that combines their experiences with the Hopkins Album Quilt, their own personal quilt, and a literature piece about quilts.
Lesson
Day 1
- Warm-up: Begin by showing students Elizabeth Hopkins’s Album Quilt and, using the About the Art section, discuss its style elements. Point out the geometric and organic shapes, the different block motifs, and the overall design of the quilt. Use a color wheel to explain that Hopkins used the complementary colors of red and green. Stress the storytelling quality of the quilt and how the different motifs reflect different aspects of Hopkins’s life.
- Explain to the students that they will be creating their own album quilts that display stories from their lives. Ask the students to sketch autobiographical panels as a rough draft for creating their own album quilts. Encourage the students to emulate Hopkins’s process of using repeated geometric shapes to create unity in her quilt.
- Remind students that they will be telling their stories through visual images. Discuss with students how each square of their album quilt needs to tell a piece of their life story. You could help students to structure the project by requiring specific content. For example, you could require a square that tells a story about family, pets, hobbies, career aspirations, favorite book/movie/musical group, family holidays, religious or philosophical beliefs, etc.
- For homework, ask the students to gather different fabrics, old t-shirts, ribbons, lace, buttons, and other materials from home to bring to school tomorrow (or whenever you will continue the lesson) that they can use to create their quilts. Another source for materials in Denver is Resource Area For Teaching.
Day 2
- Have students collect the quilt-making materials they brought from home or pass out the materials you have provided.
- Have the students re-visit their rough draft sketches and make any changes or additions. Invite the students to begin creating designs with the materials they brought in by drawing and arranging shapes.
- If you are using Heat’n Bond, have the students fuse their material to the Heat’n Bond before they cut out the shapes. After they have fused their material, have the students cut out their design shapes, arrange them on their squares, and iron them down on the background fabric.
- If you are using glue, have the students cut out shapes, arrange them into the design they want, and glue the shapes to the fabric or paper.
- If you are sewing, have students pin together their front squares, the batting (in the middle), and the back fabric squares. Pass out the embroidery needles and floss and, if needed, demonstrate how to make simple stitches to quilt the three layers together.
- When all five squares are finished, have students trim them with a border and either sew or glue them all together in one big quilt.
Day 3
- Ask for volunteers to present their album quilts to the class, telling the story behind each square and the meaning of the designs.
- Tell the students that today they will have the opportunity to connect their experiences with the Hopkins Album Quilt and their own album quilts to a play that was developed and produced in Denver.
- Depending on how much class time you can afford, either read the entire play or select an excerpt from Quilters by Molly Newman and Barbara Damashek. This play tells the story of a pioneer woman, her six daughters, and the challenges and rewards that come with life on the frontier. Through stories of girlhood, marriage, childbirth, twisters, fires, and death, the family learns the importance of love, warmth, humor, and steadfastness in the face of adversity. In the end, the various stories are quilted onto patches and assembled into one glorious, colorful quilt.
- Invite the students to reflect on the play and to draw upon their experience making a quilt with one of the following writing assignments. These writing assignments all help students better understand the relationship between storytelling and art:
- Personal reflections – When making your quilt, why did you choose the themes you did? What experiences inspired particular motifs? How did other people contribute to the final quilt block either directly or indirectly? Why did you arrange the squares in the order you did? Did you represent life events in realistic or metaphoric/abstract ways? Can you relate to any of the characters in Quilters?
- Poetry journals – Use whatever type of poem your students are familiar with or introduce them to a new poetry form (haiku, blank verse, sonnets, limericks, etc.). Have them choose one format they like and construct three poems: one about the Hopkins Album Quilt, one about their own quilt, and one about a character or scene from Quilters. The poems can be fun, analytical, or reflective.
- Argumentative piece – Have the students imagine that for some crazy reason, making quilts is outlawed. How would you present an argument that would convince people quilting was important? Tell the students to prepare a case, using Elizabeth Hopkins and the characters from Quilters as evidence that quilting should not be outlawed.
Materials
- Ten 10½ x 12 inch fabric quilt squares per student (If you work with paper you will need five paper squares. Additional squares can be added to enlarge the quilts.)
- Five pieces of 10½ x 12 inch batting material to go in between the quilt square panels (omit this material if you are working with paper)
- Embroidery needles, embroidery floss, and safety pins for sewing the quilt squares together (omit if you are working with paper)
- Glue if you are working with paper; fabric glue or Heat’n Bond and iron if you are working with fabric
- Puffy fabric markers to create depth
- Permanent markers: black
- Ribbons, lace, seam binding, fabric strips or paper strips to create borders
- Scissors
- Paper and pencils for preliminary sketches
- Color wheel
- Copies of Quilters by Molly Newman and Barbara Damashek
- About the Art section on Album Quilt
- One color copy of the quilt for every four students, or the ability to project the image onto a wall or screen
Standards
- Visual Arts
- Invent and Discover to Create
- Observe and Learn to Comprehend
- Relate and Connect to Transfer
- Envision and Critique to Reflect
- Language Arts
- Oral Expression and Listening
- Research and Reasoning
- Writing and Composition
- Reading for All Purposes
- Collaboration
- Critical Thinking & Reasoning
- Information Literacy
- Invention
- Self-Direction
Album Quilt
- Elizabeth Sanford Jennings Hopkins, American, 1824-1904
- Born: Connecticut
- Work Locations: New York
Album quilts were often made by a group of women, with each member contributing a block. This quilt, however, was made entirely by Elizabeth Hopkins. Born in Connecticut, Elizabeth made this quilt after marrying her husband Charles Hopkins in 1841 and moving to Port Jefferson, Long Island. Charles was a seaman and it is believed that in the early days of their marriage, Elizabeth accompanied him on some of his trips, during which she saw examples of album quilts from Baltimore. Album quilts flourished in the 1840s and 1850s along the Eastern seaboard. Each block of an album quilt has a different motif, made by stitching shapes cut from solid or patterned material to a background fabric. Elizabeth filled some of the blocks on her quilt with images that were relevant to her family. This quilt remained in the Hopkins family until it was acquired by the Denver Art Museum in 2007.
Album quilts of this type tended to use solid or small-scale printed fabrics. Many of the floral and decorative motifs on the Hopkins quilt are common to album quilts of the period, but some of the images are more personal. Flying the banner “HOPE,” the sailing ship surrounded by blue fish references Elizabeth’s husband’s life as a seaman and the maritime community in which she lived. Hopkins also quilted a lighthouse and a heart on the ship block. Another block (fourth row down, third column across) may represent a compass, a navigational instrument used by sea captains. The quilt block that shows a well-furnished interior and the blocks with musical instruments suggest that the family lived in a comfortable home.
Details
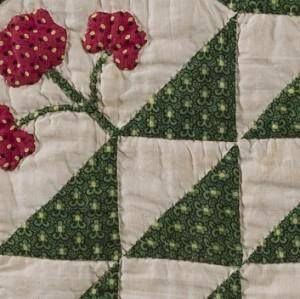
Geometric and Organic Shapes
Hopkins used both geometric and organic shapes. Geometric shapes, like triangles and diamonds, were used to create the baskets and star-shaped images. Organic shapes, with their more natural, curvy lines, were used to create leaves, flowers, and fruits.
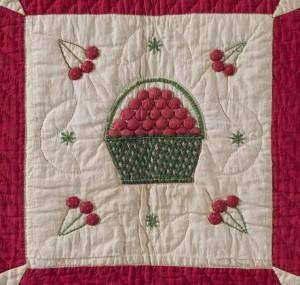
Fruit and Flowers
Various fruits and plants—grapes, apples, pears, strawberries, cherries, and tulips—can be found on different blocks throughout the quilt. Some of these details are padded and project slightly from the surface of the quilt.
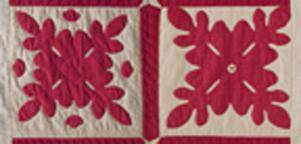
Slight Variations
The two outer blocks of the third row from the top are quilted with a snowflake-like symmetrical pattern. Though they look similar, there are small variations in design. For example, look at the center of each snowflake; one has a heart and the other has a circle.
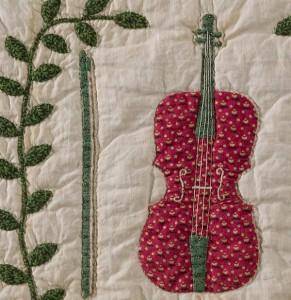
Printed Fabrics
Several green and red printed fabrics were used for various parts of the quilt. Look for the green printed fabric on the outside perimeter of the quilt and the red printed fabric used to create the violin and strawberries.
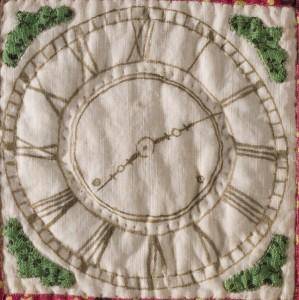
Hand-drawn Details
The tiniest details on the quilt—like the notes on the sheet music and the face of the clock—are drawn by hand.
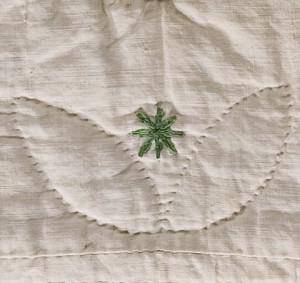
Quilting Patterns
The stitching on the quilt not only holds the layers of fabric together but also allows for additional patterns and designs. Hopkins created hearts and leaf-shaped designs with her stitches.
Funding for object education resources provided by a grant from the Morgridge Family Foundation. Additional funding provided by the William Randolph Hearst Endowment for Education Programs, and Xcel Energy Foundation. We thank our colleagues at the University of Denver Morgridge College of Education.
The images on this page are intended for classroom use only and may not be reproduced for other reasons without the permission of the Denver Art Museum. This object may not currently be on display at the museum.

