Students will explore shapes and angles through body movement and hands-on manipulations within the context of the Denver Art Museum’s Frederic C. Hamilton Building.
Students will be able to:
- make at least two angles using different parts of their body;
- point out angles in their environment;
- express at least one difference between organic and more angular shapes (Pre-K students); and
- share with another student or the teacher two of their favorite shapes or angles.
Lesson
- Warm-up: Have students dance to the music you’ve selected. Set the tone for a fun time of body movement and exploration!
- Ask the students to sit on the floor in a circle with their legs stretched out straight to the center of the circle. Have them bend one of their legs so the bottom of their foot touches the inside of the opposite leg. Have them trace the shape of their bent knee and the shape of their straight knee. Ask them if they notice any difference.
- Do their knees look different?
- Do they feel different?
- For older children, you can share that the bent knee is called an angle, which occurs when a straight line is bent.
- Have students look around the room and bring back to the circle at least one object that has curves or bent lines (or you can distribute objects you’ve already selected). Ask them to trace the curves or bends with their fingers. What do they feel like? (i.e., pointy, smooth, bendy, etc.)
- Using music again, have the students do a freeze dance. They will dance around until you stop the music and call out a shape. They are to freeze with their bodies somehow making that shape. Choose about three to four shapes.
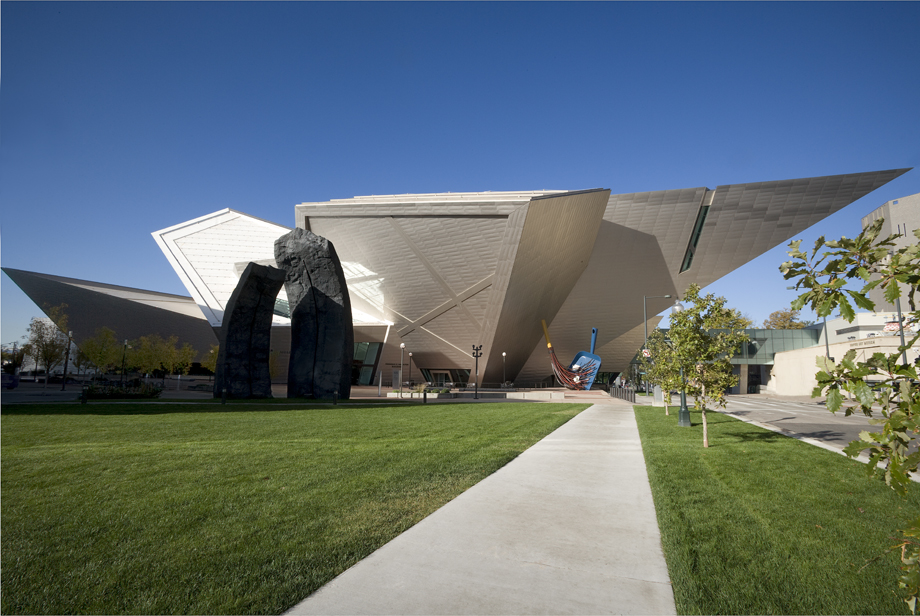
- Have students sit in a circle again. Tell them that all around them they can see shapes and angles, even in buildings. Hold up laminated copies of the pictures of the Frederic C. Hamilton Building.
- Ask if any of them have ever seen the building before.
- Passing around the photographs, ask the children to trace and point out different shapes they see on the building. (Older children might be able to name and talk about the shapes.)
- Have they ever seen shapes like this anywhere else? (Daniel Libeskind, the architect, was inspired when flying over the Rocky Mountains to achieve his overall design.)
- Pass out one strip of paper to each student. Have them bend and fold the paper until it is completely folded, and then have the children open up their folded strips. (Studio Daniel Libeskind architects did the same exercise to help them find unique angles to incorporate into the building.) Ask them to trace some of the angles and compare the shapes to objects in the room.
- End with another round of dancing, stopping to freeze into different shapes and angles. This time have them try to make angles that they saw in the pictures of the building. They might extend their arms and legs out to create the shapes, etc.
Teaching Tip: Fun Ways to Get into a Circle
Circling up is a useful way to organize and focus learners. A fun way to help them create a circle is to make “chicken,” “airplane,” and “Velcro” circles.
- For “chicken” circles, students make chicken wings with their arms and cluck like chickens. After a little bit you have them touch their elbows to make the circle.
- For the airplane circle, have them extend their arms out like airplane wings, fly around a little bit, and then touch fingertips to each other in circle formation.
- Lastly, they can make a “Velcro” circle, where they come in very close together and touch shoulder-to-shoulder/arm-to-arm. From this shape you can step back to “chicken” circle or “airplane” circle. They just love to giggle as they jiggle closer to touch.
Be energetic and silly as you call out the names of the different circles before selecting the final one you need to either stand or sit for your activity.
Materials
- At least one different three-dimensional object per child; some should have more traditional right angles, and others should incorporate more acute angles and organic shapes. You might look at toys in the classroom, such as doll houses, blocks (especially triangular blocks), pots and pans, storage bins, etc.
- One two-inch by one-foot long strip of paper for each student (copier paper works best; construction paper is also fine)
- A CD and CD player or access to music online
- About the Art section on the Frederic C. Hamilton Building
- 1 color copy of the painting for every 4 students, or the ability to project the image onto a wall or screen
Standards
- Visual Arts
- Observe and Learn to Comprehend
- Relate and Connect to Transfer
- Critical Thinking & Reasoning
- Information Literacy
- Invention
- Self-Direction
Frederic C. Hamilton Building
Daniel Libeskind and Davis Partnership Architects, United States
2006
146,000 sq. ft.
Photo by Jeff Wells, Courtesy of the Denver Art Museum
Photograph © Denver Art Museum 2009. All Rights Reserved.
Architect Daniel Libeskind worked with Denver-based Davis Partnership Architects to design the Denver Art Museum’s Frederic C. Hamilton Building.
Libeskind was born in Poland in 1946, the son of two Holocaust survivors. At the age of eleven, he immigrated to Israel with his parents, where his family lived for two years before they left for New York. Libeskind was one of the last immigrants to arrive by boat through Ellis Island and he became an American citizen in 1965.
As a child Libeskind was a musical prodigy, winning international competitions with his performances on the accordion. He left music to study architecture at New York’s Cooper Union for the Advancement of Science and Art, followed by graduate work at Essex University in England. He went on to work as a professor and theorist before completing his first commission, Berlin’s Jewish Museum, at the age of fifty-two.
The Denver Art Museum’s Hamilton Building is Libeskind’s first completed building in the United States. He was also chosen as the master plan architect for the World Trade Center site in New York City.
In 1999, museum director Lewis Sharp and then-mayor Wellington Webb decided it was time for the museum to expand. A new building would allow the DAM to display more of its world-class collection and provide the space needed to host major traveling exhibitions.
With the Hamilton Building, Daniel Libeskind continued a tradition of bold architecture that began with Gio Ponti’s North Building. Libeskind tells us that he was inspired by the “craggy cliffs of the Rockies” and by his experiences in Denver. He describes Denver as “a dynamic place, the people are dynamic. And that is part of the composition of the building.” The lively architecture signals to the public that new things are going on inside; the experience begins before one even enters the DAM.
Details

Titanium
Libeskind chose to complement Gio Ponti’s million gray glass tiles of the North Building by selecting another reflective and unusual material: 9,000 titanium panels. Libeskind said, “We had an aim from the beginning: a building that is luminous.” The Hamilton Building’s different sides reflect light at different angles, and thus appear to be different shades of gray. The titanium also reflects varying colors throughout the day. It often appears more rosy in the early morning hours and golden at sunset, depending on the weather.
Fun Fact: 9,000 titanium panels cover the building’s surface.
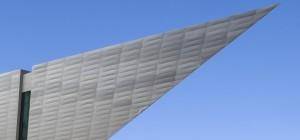
The Prow
The tip of the building, which we call the “prow,” makes a reaching gesture across 13th Avenue toward the North Building and Civic Center. The angled walls of the prow, and the many other angled walls that shape the building, are reflected inside and create unique interior spaces. These dramatic spaces have provided new opportunities for innovative displays of artwork.
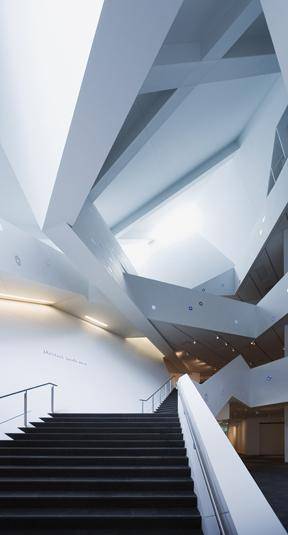
The Atrium
Libeskind spoke of the atrium as an introduction to the visitor’s experience of the building: “The first sounds, the atmosphere, the connectivity with that atmosphere—the mood is set. And I think it’s proper that an atrium should set those moods because that’s where you quite literally enter, get informed, get ready for an adventure with art.” The walls and ceiling of the atrium create a variety of shaped spaces, making it one of the most dramatic spaces in the building.
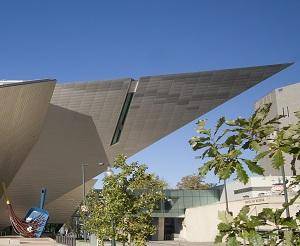
How Does the Building Stay Up?
The building is essentially a giant truss, meaning its steel frame is a balanced network of interlocking triangles. After all the steel beams are set in place, the building holds itself up and transfers weight to “anchors” of concrete pillars that reach down into bedrock. Libeskind described the building as a tree, branching out from these anchoring “roots.”
Fun Fact: 2,750 tons of steel and 50,000 steel bolts were used in the Hamilton Building.
Funding for object education resources provided by a grant from the Morgridge Family Foundation. Additional funding provided by the William Randolph Hearst Endowment for Education Programs, and Xcel Energy Foundation. We thank our colleagues at the University of Denver Morgridge College of Education.
The images on this page are intended for classroom use only and may not be reproduced for other reasons without the permission of the Denver Art Museum. This object may not currently be on display at the museum.
