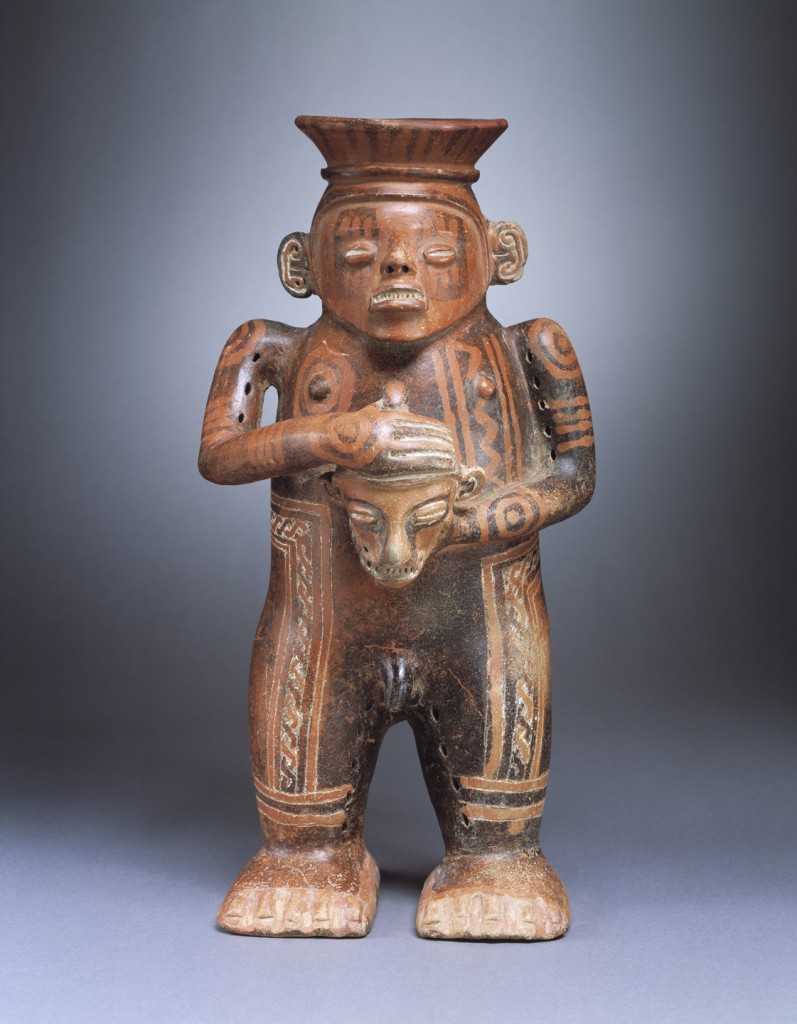
Students will examine and analyze the image of the Warrior Figure with Trophy Head, paying particular attention to the body art designs applied as a resist on the figure. Students will research body art and modern tattoo designs and create their own resist artworks.
Students will be able to:
- describe and analyze the image of the Warrior Figure with Trophy Head;
- discuss and identify symbolic representations and designs; and
- synthesize ideas found in a work of art to create a personal response.
Lesson
Day 1
- Show students the image of the Warrior Figure with the Trophy Head as well as the 360º view found on Creativity Resource so students can see all sides of the object.
- Ask students if they are able to identify any clues as to the culture or age of the object.
- Review the About the Art information and the details in the “Things to Look For” section. Have students identify the details on the object.
- Discuss the significance of the exaggerated features and how these features show symbolic power, as discussed in the “What Inspired It?” section of the About the Art sheet.
- Discuss the symbols that can be found on the figure. It is thought that these symbols and designs provide magical protection and power to the owner. The designs could be references to tattoos or perhaps body paint.
- Examine the designs. Ask students: Do they remind you of designs you have seen from other cultures? How? Why do you think these particular designs are symbols of protection and power?
- Read in the information how these designs were created by using a resist technique. Explain to the students that they are going to create their own symbols of power and protection also using a resist technique. Provide symbols of various cultures for students to examine. You might wish to provide examples of modern day tattoo designs from a variety of influences.
- Have students sketch their ideas for symbols of power and protection and then create a final sketch the same size as the final paper—5 x 5 inches or so is a good size.
- Final paper should be heavy stock paper with very little tooth. You could also use squares of muslin fabric.
- Have students draw their design very lightly on the final paper, then trace over the design with washable glue. They can vary line thickness to add interest if they want. Let dry overnight.
Day 2
- Review what the students learned about the Warrior Figure with Trophy Head from the previous lesson.
- Have students retrieve their projects from the previous class. Pass out tempera paint and painting supplies.
- Have students paint in between the glue areas with a quality tempera paint. It’s okay if a little of the paint gets on the glue as it will wash off with the glue. Do not use washable tempera as it will not stay on the fabric. Brighter, more opaque colors work well.
- Let paintings dry, then have students wash off the glue in the sink by gently rubbing the glue areas with their hands. Some of the tempera will come off and this adds to the resist effect. Do not leave it in the water too long or have the water pressure too high. It might be worth it to do a test run first for everyone to see. They can continue rubbing off glue even if it is out of the water. If the painting is still sticky, glue remains to be rubbed off.
- When finished, let dry and mount onto a black tag board. Ask for volunteers to share their resist designs with the class, explaining their artistic choices and how the design represents power and protection to them.
Materials
- Sketch paper for each student
- Pencils with erasers for each student
- One five-inch square piece of heavy paper for each student plus a few extras for mistakes, or roughly the same size muslin squares for each student, preferably washed so the sizing is removed
- Books or other references to modern and cultural tattoo designs. The Denver Public Library has many books about tattoo design available.
- Washable school glue in bottles for every two students
- Good quality tempera paints (NOT washable)
- Paint brushes, paint mixing trays, bowls of water to rinse brushes, paper towels
- Access to a sink
- Drying racks or another area for paintings to dry
- Access to the Internet to see the 360º image of the object on the Creativity Resource webpage for the Warrior Figure with Trophy Head
- Optional: black tag board cut one inch bigger than the paper or muslin, used for mounting finished resist designs
- Copies of About the Art sheet on the Warrior Figure with Trophy Head (found at the end of the lesson plan) or student access to this part of Creativity Resource online
- Color copies of the image for students to share, or the ability to project the image onto a wall or screen
Standards
- Visual Arts
- Collaboration
- Critical Thinking & Reasoning
- Information Literacy
- Invention
- Self-Direction
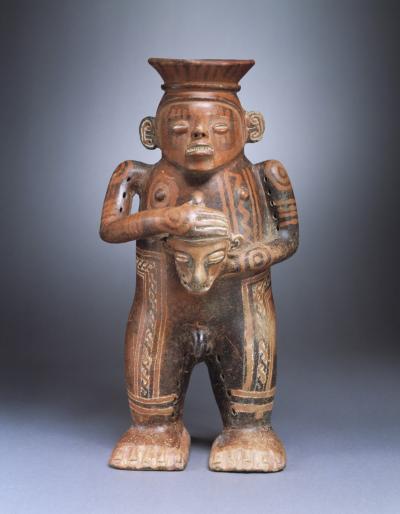
Warrior Figure with Trophy Head
A.D. 500-1000
Height: 14.875 in. Width: 7.375 in. Depth: 7.25 in.
Denver Art Museum Collection: Collection of Frederick and Jan Mayer, 246.1992
Photograph © Denver Art Museum 2009. All Rights Reserved.
This sculpture was created by an artist from the Central Highlands or Atlantic Watershed region of Costa Rica. To make this ceramic sculpture, the artist used slabs and coils of clay to gradually build up the sculpture. This gave the clay time to partially dry so that it could support the weight above as more clay was added. The artist then coated the smooth surface with a reddish slip (a mixture of clay and water) and burnished the slip to bond it firmly to the clay. This vessel was probably fired (heated to harden the clay) out in the open, with clay objects placed in a slight depression in the ground and fuel carefully placed around them. This technique produced porous ceramics called earthenware.
After firing, the artist used a sharp tool to engrave or scratch patterns onto the figure’s legs and body. The artist applied the final decorative touches using a smoking technique. Areas where the artist wanted the original surface color to show through were painted with a resist material, possibly a slip, to protect the surface from smoke. When placed over a smoky fire, the areas of the vessel that weren’t covered with the resist material took on a darker tint. The resist material was then washed off, revealing the design.
This figure portrays a powerful man, probably a warrior or chief. He holds a head carefully with both hands. The head, which resembles his own, suggests that the warrior has defeated a peer—either killing him in battle or sacrificing him afterward. Alternatively, the head could be the cherished relic of a revered ancestor. Such a relic might have brought protection and spiritual power to descendants. The high status of the victor is evident in both his elaborate body decoration and his confident stance, with huge firmly planted feet, stocky legs, and projecting chin.
Details
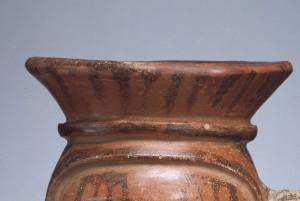
Vessel Opening
The opening of this sculptural vessel is at the top of the figure’s head. The vessel chamber in the body is sealed off from the hollow arms and legs. Thus, liquid could not leak through the multiple vent holes pierced in the figure’s limbs.
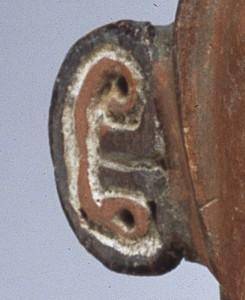
Incising
The rough nature of the white lines in the ears, the mouth, and on the legs, back, and hips indicate that they were engraved after the vessel was fired. If the lines had been carved into the soft clay before it was fired, a cleaner line would have been produced—a process called incising.
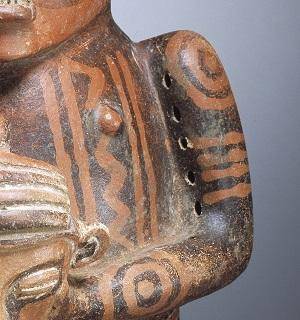
Designs
Created using the smoke and resist technique, designs on the arms, chest, and face of the figure may have imparted magical protection or powers, or they may have signaled clan membership or some other affiliation.
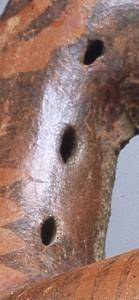
Holes
Notice the holes on the inner arms and inner legs. These holes served as vents and helped air circulate more freely during the firing process. This prevented the vessel from exploding.
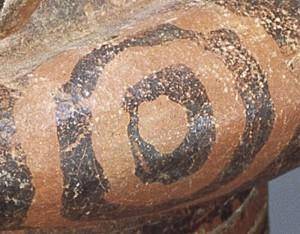
Curvilinear Patterns
The resist painting was usually done in curvilinear patterns. Notice the spirals on the arms.
Funding for object education resources provided by a grant from the Morgridge Family Foundation. Additional funding provided by the William Randolph Hearst Endowment for Education Programs, and Xcel Energy Foundation. We thank our colleagues at the University of Denver Morgridge College of Education.
The images on this page are intended for classroom use only and may not be reproduced for other reasons without the permission of the Denver Art Museum. This object may not currently be on display at the museum.
