Taking inspiration from the printed fabrics used in the Pratt Family Album Quilt, each student will create their own printing block and five prints. They will then swap prints with other students. After swapping prints, each student will assemble a quilt that is unique and personal.
Students will be able to:
- analyze and evaluate the Pratt Family Album Quilt for its defining characteristics;
- create a printing block from a flower design and a piece of cardboard;
- create six prints with their printing blocks;
- work cooperatively with classmates in trading prints; and
- create a floral quilt square.
Lesson
Day 1
- Warm-up: Show the Pratt Family Album Quilt to the students and discuss its main elements such as the printed fabric, borders, and hand drawn details. (Refer to the About the Art section for more information.) Explain that many early printed fabrics were created by carving a design into a block of wood and stamping the fabric.
- Explain to the students that each one of them will be making a quilt square with flowers on it. Tell them that their first task is to draw a flower. You could show examples of state flowers, flowers that represent different months, or just have the students come up with their own design.
- Pass out drawing paper and pencils and invite the students draw three sketches of flowers. Have them select one of the sketches, re-draw it on foam board or cardboard, and cut out the flower.
- Glue the tag board flower to a piece of heavy cardboard. This will need to dry thoroughly.
- Distribute six 10½ x 12 inch pieces of paper or cloth to each student to make prints on. Instruct students to make six prints of their flowers. You will need brayers or paintbrushes and a hard, flat surface on which to lay the paper or cloth. Have plates or bowls of paint or ink ready so the students can apply it to their stamps easily. You may want to encourage older students to try working with two colors for their prints. Students will need to re-ink their print blocks a couple of times to create five prints in vivid color. Make sure the students sign their names to the front of each print. Let the prints dry overnight.
Day 2
- Display the Pratt Family Album Quilt again and have students compare their flower prints to the printed fabric on the quilt. What is similar? Different?
- Explain to the students that each square in the Pratt quilt was contributed by a different person who wanted to wish the Pratt’s a happy marriage. Today, the students will do a similar exchange, swapping their prints with those of their classmates as a way of displaying friendship.
- Have students exchange five of their six prints with each other. Students should end up with six different prints: the print that they created and five prints from other students.
- Invite the students to arrange their prints in a final quilt-like design and glue the squares together to make one final product.Distribute markers and encourage the students to add details such as a vase, leaves, insects, a trellis, etc. to their squares.
Materials
- Drawing paper and pencils for preliminary flower sketches
- One 5 x 7 inch piece of heavy tag board, foam board, or cardboard per student
- One 6 x 10 inch piece of thick cardboard per student
- Cookie trays or large paper plates
- Brayers (small rollers for ink) or paintbrushes
- Printing inks or paints in assorted colors (poster paint can be thickened with a little glue)
- Black permanent markers
- Scissors
- Fabric glue if using fabric; glue if using paper
- Six squares of fabric (muslin if possible) or paper, approximately 10½ x 12 inches for each student’s quilt
- A great source for fabric and art materials in Denver is Resource Area for Teaching (RAFT)
- About the Art section on Pratt Family Album Quilt
- One color copy of the quilt for every four students, or the ability to project the image onto a wall or screen
Standards
- Visual Arts
- Invent and Discover to Create
- Observe and Learn to Comprehend
- Relate and Connect to Transfer
- Envision and Critique to Reflect
- Language Arts
- Oral Expression and Listening
- Reading for All Purposes
- Collaboration
- Critical Thinking & Reasoning
- Information Literacy
- Invention
- Self-Direction
Album Quilt
- multiple
This signature quilt was made as a wedding present for Anna Eliza Pratt (1823–1895), granddaughter of one of Philadelphia’s leading merchants, on the occasion of her marriage to Lewis Perrine. Each well-wisher whose name appears on the quilt gifted a block (an individual square of quilted fabric), but the identity of the skilled maker is still in question. We do know that the quilt was made in the Delaware River Valley and is dated September 15, 1842 (a date of 1843 also appears on the quilt). Each block contributed to the quilt is different. To create bouquets, flowers were cut out from printed cottons, assembled into a design, and hand-stitched to the background fabric. This method of stitching one piece of fabric onto another is called appliqué. The Pratt Family Album Quilt displays elaborate cutting and appliqué techniques, and many of the blocks have fine details drawn in pen and ink.
Signature quilts were made to commemorate an event such as a wedding, birth, or major move. This quilt was made to celebrate the marriage of Anna and Lewis Perrine. Signature quilts became popular around the 1840s. When making a signature quilt, friends and family would sign their names and possibly a date, location, religious verse, or other token of remembrance as a way of expressing friendship for the recipient, not as a way of identifying their own workmanship. The names on the quilt were meant to remind the recipients of their friends and family; signing the quilt was like signing a card today. Women would sign with ink, demonstrating their elegant handwriting and creating a diverse array of handwriting styles on the quilt. It was very difficult to write on cloth, however, so signatures were not always written by the person named. Sometimes signatures were written by a professional calligrapher, and sometimes simply by the person with the best handwriting.
Details

Central Block
The block in the center of the quilt is larger than the rest and contains a large bouquet of flowers with four smaller flowers in each corner. Also in the center is a butterfly and what look like two hummingbirds. The large bouquet is set on white cotton with interlacing circle, leaf, and line stitches.
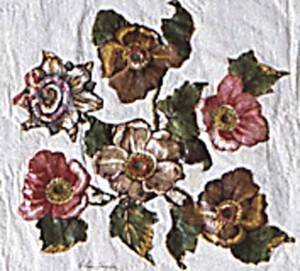
Appliqué
Notice how flowers are cut out from printed fabric and stitched to the background fabric—a technique known as appliqué. The appliqué technique used on this quilt involves printed fabric and is referred to as broderie perse [broe-dair-ee pearz] (Persian embroidery).
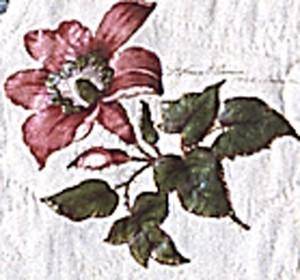
Hand-drawn Details
Some of the finely detailed leaves, flowers, and what appear to be sheaves of grain were hand-drawn with ink. All of the hand-drawn details are monochrome (one color) and surround the more colorful bouquets.
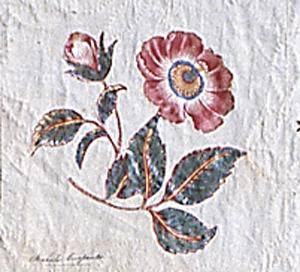
Signatures
The signatures of well-wishers can be seen in the corners of many of the blocks.
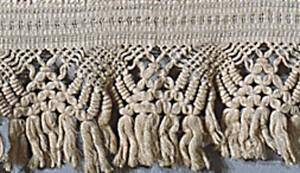
Borders
There are four borders, or outlines, on this quilt. The inside border that surrounds the individual blocks is the narrowest border. It is made from a flower and lattice fabric and applied whole and not as cut-outs. The next border is made up of printed fabric that is cut and appliquéd. Outside of the appliqué border is a fabric border of flowers and leaves. The fabric for this border is used whole and not as cut-outs. The final border, which surrounds the entire quilt, is made of lace.
Funding for object education resources provided by a grant from the Morgridge Family Foundation. Additional funding provided by the William Randolph Hearst Endowment for Education Programs, and Xcel Energy Foundation. We thank our colleagues at the University of Denver Morgridge College of Education.
The images on this page are intended for classroom use only and may not be reproduced for other reasons without the permission of the Denver Art Museum. This object may not currently be on display at the museum.

