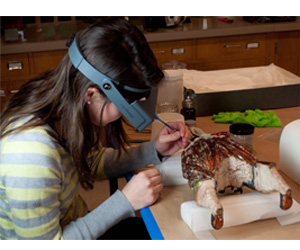
My initial examination revealed that the sculpture of King Caspar was in poor condition. Many of the wooden joints were loose; some pieces were broken and missing. The paint and barniz chinesco surfaces were actively flaking and the sculpture was very grimy. In collaboration with curator Donna Pierce, I designed a treatment plan that will restore the structural stability of the sculpture so that it can be handled, studied, and displayed safely. We also decided to pursue aesthetic compensation so that it can be effectively understood as a devotional object.
In today’s post I’ll talk a bit about the methods that I used to clean and stabilize the structure of King Caspar.
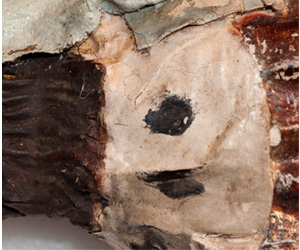
Cleaning a painted surface is not always as straightforward as it may seem. Working from the top down, there is often a grime layer, a clear coat or varnish layer (frequently discolored over time), and then the paint itself. In the case of King Caspar, there are also layers of gilding. The challenge in cleaning is to remove only the topmost layer of grime without disturbing the layers below, and that’s where some of the chemistry of conservation comes into play.
Prior to choosing a cleaning system, I did a lot of testing to understand the sensitivity of the painted surface. In the end I chose to use a combination of cleaning systems to achieve a desirable result. The treatment was successful, and the grime significantly reduced.
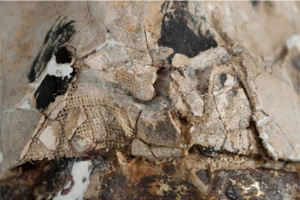
As I was cleaning, I reattached paint flakes that were loose or lifting by carefully feeding a dilute adhesive solution under the flake with a brush and applying gentle pressure—a process called “consolidation." The consolidation technique, while time-consuming, was incredibly effective at stabilizing the flaking barniz chinesco of Caspar’s cloak.
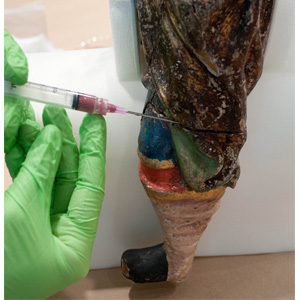
After grime was removed from the surface and the paint was consolidated, I began to stabilize the wooden structure. I injected an adhesive mixture–including an inert powder that thickens or bulks the adhesive and keeps it from shrinking–into the loose joints of the sculpture using a syringe. The bulked adhesive filled the gaps and also eliminated movement of the joints, which was actively causing damage to the adjacent painted surfaces when the object was handled.
Then, I repaired a break in the textile collar using an underlay of Japanese paper called Kozo. This type of paper has long, strong fibers that can bridge gaps or breaks but is flexible and sympathetic to the surrounding textile. The underlay was carefully inserted beneath the textile using tweezers, and it was secured with a synthetic adhesive mixture.
With the structure largely stabilized, I moved on to the aesthetic portion of the treatment. This stage of treatment will be discussed in my next post.
Headline image credit: Sculpture of a Man (King Caspar), c. mid-eighteenth century, Ecuador. Polychrome wood. Denver Art Museum: Gift of the Stapleton Foundation of Latin American Colonial Art, made possible by the Renchard Family, S-0360.